One of our daily daycare activities is to count the days of the month to the current date, recite the days of the week, name the month, etc. and for the past three years I haven’t been terribly excited about the calendar(s) I’d been using.
The first calendar I used was a basic dry-erase calendar. Each day I’d write in the date. Sometimes I’d jazz it up by using different colors, or different handwriting styles, but I just wasn’t happy with it. I thought it looked sloppy and unprofessional. Not that the 3 year old kidlets care one way or the other, but “I” care!

Over the summer I signed up with a different curriculum company and they sent me a nicer looking calendar and each month I could order themed squares with the dates on them. It was kind of cute, really, because it taught patterns and colors in addition to the numbers for the date.
The obvious dilemma- how to get those squares to stick to the calendar? I could use tape, but that seems cheap and how will I re-use the squares again without damaging them or getting them stuck together. I could use velcro, but I really didn’t want to cover my calendar with velcro fuzzies- that would drive me nuts! So I picked up some vinyl business card holders and cut them in half and glued them to the calendar to hold the date squares. It worked perfectly!

For October I made my own date squares. I used black, orange and purple paper- wrote the numbers with black and metallic silver Sharpies and we continued working on colors, patterns and numbers each day when we add the date.

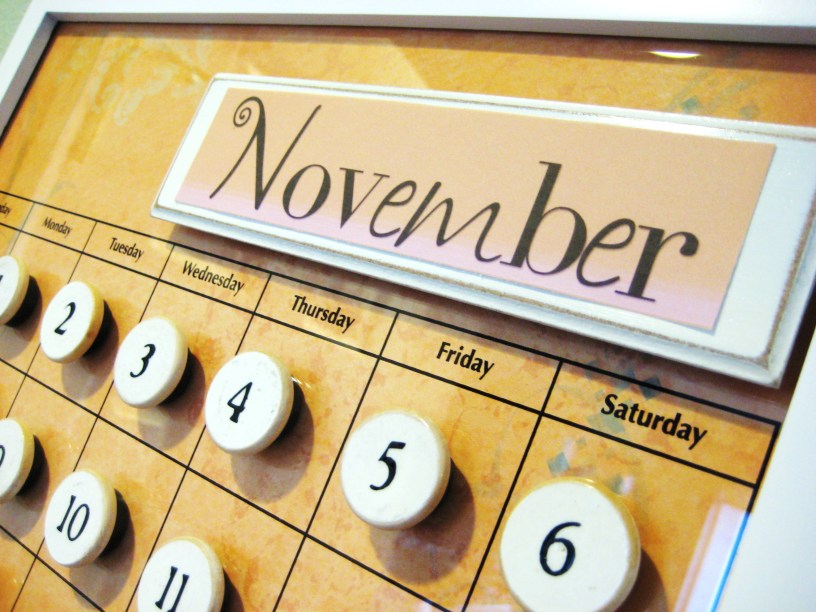
For November I used shades of brown and orange and glued little leaf cutouts onto each square. But I still wasn’t happy. I was using construction paper (which if you are paper crafty like me- you hate construction paper) and my squares were lacking durability and pizzaz. Plus, it’s hard for three-year olds to distingquish between pumpkin, cinnamon and bark shades of brown!

I’m always keeping my eyes open for a calendar solution.
Over the weekend I took the girls shopping for party supplies for Riley’s birthday. We went to Craft Warehouse and I saw a display of calendars and found one that I thought would be perfect! It was white, made of a dry-erase board, but magnetic, and framed in black. It looked really nice. It also had a storage box attached where I could keep my dry-erase markers, or if I had magnetic date tiles I could use it to holdl those….so I loaded it into my cart. It was on sale for $19.99. 
Sure, I have to “write” my numbers again…but maybe not? Maybe I could make some magnetic numbers and store them in the hanging bins? Hmm….I really like the style and there are so many possibilities with it…. I’m SOLD!
Then I walk around the corner.
Ugh.
I see something that looks similar to this:

It’s a beautiful calendar display using scrapbooking paper, magnetic backing, a clear dry-erase type surface, and the display in the store had little white-painted wooden disks with the date printed on the front- and magnets on the back, and a wooden plaque for the month….my creative juices start flowing and I can’t control them!
THAT is much more my style!
I start collecting the items and throwing them into the cart- anxious to get home and start painting the little wood ‘pancakes’. Then I put everything back.
I added up the cost of this little “project” and it was well over the $19.99 I’d planned to spend on the other calendar.
Then I think to myself….”hey, I haven’t done anything crafty in quite a while, I’m due, and this is cute, and it’s for the daycare room, and I can change the paper every month to keep it fun, I’m gonna do it!”
I can justify just about anything!
Here’s the shopping list:
12×12 white frame: $6.00
12×12 magnetic sheet: $3.99
12×12 acrylic calendar sheet: $8.99 (used my 40% off coupon, it was regularly $14.99)
2 packs of wooden discs: $2.99 each
1 month plaque: $1.25
4 packs of 8 magnets: $1.99 each
a pack of rub-on numbers: $7.99 (I returned these, see below)
I already had the paint, a sanding block, and of course a vast selection of scrapbooking papers to use as backgrounds each month.
Step one: assemble frame. Remove the glass and replace it with the acrylic calendar, then slide a piece of paper behind it, then the magnetic sheet, then put the back of the frame on.


Step two: paint all the wooden discs and the month plaque white.

Step three: once the discs and plaque are dry, use a sanding block to rough sand the edges for a more rustic look.


Step four: clear coat everything! I used a gloss finish clear spray paint we had in the garage. On the month plaque I also brushed on a layer of Modge Podge so it would look even more rustic.

Step five: put a date on each disc using rub-on numbers. (I had actually purchased a pack at Craft Warehouse, but saw that I had paid $7.50 for them AND it was missing the 4 from 24! Ouch! So I used my Cricut instead and cut out all the dates in 1/2″ font using Cricut Vinyl. Easy cheesy!)


Step six: clear coat the number discs several times.
Step seven: glue magnets onto the backside. Make sure you get really strong magnets- as there is a layer of acrylic and a layer of paper between the magnet and the magnetic sheet!
Step eight: Assemble!


I think I might jazz it up a bit- I like how the “MyimaJENNation” gal hung hers up on a rod with bows and such. So I think I might give that a shot. And at some point I might make the glass numbers instead of the wooden ones…but the underlying display is the same- and will always be fun to put together!

You are so clever and what a great daycare instructor you are. I am very proud of you., love you lots, and Happy Thanksgiving to all.
Awesome… I can see using one of my Everyday display boards and making a magnetic calendar on a smaller scale… thanks for sharing your crafty journey.