
I didn’t have to work last Friday….. and the kids Martial Arts school was closed for instructor training….. which meant a completely FREE Friday for four of us…. so we decided to have Jim take the day off work so we all could go do something fun as a family.
Our destination? Mt. St. Helens

I was especially excited to see Mt. St. Helens because I remember the eruption when I was a kid- I was only 7 years old. I remember seeing the giant ash cloud and I remember my dad driving us up to the top of Cooper Mountain so we could get a better view. I wish now that we had pictures of that day, but there’s a few available online that capture my memory well enough… like this one:

The kids obviously had no idea what the deal was with Mt. St. Helens so we found several videos and documentaries on YouTube to explain to the kids WHY we wanted to see Mt. St. Helens. Here’s the link to our favorites:
http://www.youtube.com/playlist?list=PLxArS1Jq0ckp-tedFIOQJI-VfeyvEmbJP
Watching those videos worked! The kids were now excited for the trip. Except they were nervous about the Ape Caves adventure we were planning because the thought of touring a pitch black dark cave with bats and mice and hardened lava and it being damp and cold didn’t sound very appealing!
About the Ape Caves:
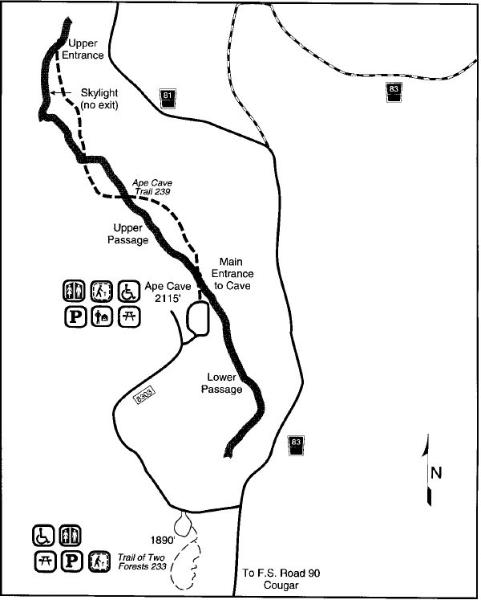
Mount St. Helens Ape Cave Lava Tube is a popular attraction in the Mount St. Helens National Monument and the longest lava tube in the continental United States at over two miles in length. The Ape Caves are located on the south side of Mount St. Helens. Common lore attributes the “Ape Cave” name to a scout troop who explored the caves back in the early 50’s. Apparently the troop’s sponsor was the St. Helens Apes – a group of foresters. Foresters and loggers in those days were sometimes referred to as “Brush Apes”.
About 2,000 years ago lava poured down the southern flank of Mount St. Helens in streams. As the lava flowed, the outer edges of the lava stream cooled forming a hardened crust which insulated the molten lava beneath. This allowed the lava to remain hot and fluid encased in this “lava tube” and continued flowing for months during the eruption. The end result was the creation of this spectacular 13,042 long lava tube.
The upper Ape Cave is 1½-mile long and takes about 2½ hours to complete, returning on a surface trail. This section is more adventurous as cavers must climb over approximately 27 boulder piles and scale an 8-foot high lava fall. The boulder piles formed after the eruption subsided and the fluid lava drained from the tube. As the lava tube cooled, it began to shrink and crack. These cracks weakened the ceiling and walls causing parts of them to collapse – forming entrances to Ape Cave. Note there is a skylight hole in the tube near the upper exit however the trail continues on through the tube to a permanently attached metal ladder. Exiting the cave through the skylight is off limits. Recommended equipment for exploring the Ape Caves is sturdy shoes or boots, warm clothing, and three sources of light.
Our itinerary for the day:
Leave our house at 7:45am. Stop for gas and bananas (for the apes- hee hee!) Drive to the Ape Caves first, arriving around 10am. Tour the “Upper Cave” then enjoy a picnic lunch around 1pm. After lunch, head up to the Windy Ridge Observatory on Mt. St. Helens- the view of the crater is supposed to be phenomenal and supposedly it’s a better view than the more popular Johnston Ridge Observatory. Tour until dark (or done, whichever comes first) then head home!

We decided we’d pack a bunch of snacks and make sandwiches for lunch. Here’s Brooke making a list of what to pack, and a timeline of when to wake up, leave, etc.

Oh boy is she taking after her mama!
Friday morning…..
We were running late from the get-go. It was nearly 8:30 by the time we hit the road. Oopsie. It worked out well, though in the end. You’ll see.
We got to the Ape Caves shortly before 11am. We had a light snack (granola bars & bananas) but no drinks because it’s a 2.5 hour hike without bathrooms! We put on our hoodies and jackets and everyone was fitted with a headlamp and given a flashlight to hold as well..

I have to confess. I’m wearing a hat because, well, short hair and headlamps do NOT fare well together. The kids were embarrassed when they saw my hair poofing up on either side and knowing that we had non-headlamp adventures planned I needed to figure out what to do about my ‘do. Thankfully, Riley brought a stocking cap…
It ended up being a good thing, and not because of my hair, but because the cave ‘drips’. It didn’t feel as gross having it drip on my hatted head. No “ewwww!” came from my mouth, unlike others! So I recommend wearing a hat.
Anyway, here we are outside the cave entrance:

We headed down the stairs into the dark abyss….

Oh boy it gets dark!
Once inside, you have a choice of continuing straight into the “Lower Cave” which is a flat and easy walk…..you go to the end and turn around. OR, once you enter the cave, turn around and go under the stairs to access the “Upper Cave”. It’s supposed to be a challenge with rock piles and an 8′ tall lava wall that you have to climb over….and it has an exit at the end from which you will walk outside on a trail back to the parking lot.
Of course, we chose the “Upper Cave”.

You definitely feel the chill. Supposed to be about 42-degrees. I was wearing a tank-top (for the outside walk back), a long sleeve t-shirt, a fleece sweatshirt, a jacket and a knit hat. Oh and gloves. I’d rather be too hot than too cold and I knew that we’d be active, generating body heat, so I figured if I got too hot during the walk I could strip a layer. I never ended up feeling too hot.
The girls only wore hoodies and t-shirts and they complained they were very cold at the beginning, but they were fine once they started moving.
Anyway- we started our adventure. First up was a HUGE rock pile. I’d read about them, but goodness- this was massive! Were we really supposed to go OVER it? Well, there wasn’t any other way around it, nor was there any type of path or indication of how to get over it, so we just started climbing.
I really wish I would have taken a picture of it. Here’s a picture of one of the MANY smaller piles we had to go over:

That should give you an idea of what we were dealing with!


Sometimes, though, the cave would be clear….


If the ground wasn’t covered with big jagged rocks, it was either hardened lava….

Or stone with big deep cracks…. (notice the lantern?)

Or sometimes the floor was more like mud. With puddles of water.
The rock piles are all places where the roof has caved in and crashed down. Sometimes those stones had interesting textures:


And some of those stones were downright HUGE! The picture below shows just how big that chunk above is!

To show off how big some of the boulders are….

Trevor is wearing the gray hoodie. Riley is in the pink hoodie. She is standing on a rock that comes up to Trevor’s thigh. Here’s that same area of rocks without the kids standing on them….

Yep. That’s what we were dealing with again and again.
It was always interesting.
Sometimes the ceiling was pointy…

Sometimes the ceiling was covered in tiny white crystals…

At one point the walls had an orange-colored “ooze” on them..,.

The only way to really see any detail was to have all of us shine our lights together because it is just so dark. So so dark.
We thought it would be fun (twice) to all turn off our lights and be quiet to listen to the darkness (and dampness) around us. It was eerie.
Making it more eerie is when the kids figured out they could tilt their headlamps to only illuminate their faces!

The highlights of the cave were the skylight, and the 8′ drop/wall.
Here’s the skylight:


And here’s the eight-foot lava wall (looking down it after we climbed up it):

It’s like a tube…..8′ tall and straight down/up (depending on whether you are at the top or bottom of it!). Trevor was the first to climb up it, by himself. Then Jim helped Brooke up, Riley climbed up herself, then me, then Jim. After we were all up, Trevor decided to go DOWN it. I capture his adventure on video….stay tuned.
Just past that obstacle was another lava ‘slide’….

At least this one wasn’t smooth- it had textured rough rock to climb up!
And because Trevor was enjoying modeling, here he is again…

We finally made it to the end. Not only is the staircase (er, ladder?) steep and narrow….

Getting out of that ‘hole’ is pretty tight! My back was rubbing on the rock above/behind me.

And once you are out and continue climbing up the hill a few feet….when you look back, you can’t even tell there’s a ladder to get down into that hole!

Supposedly boy scouts discovered this cave years ago- brave little kids!
Here’s a video of our adventure….
Our walk back was above ground on a trail and it was decently warm. We all stripped our jackets and wore t-shirts or tank-tops and were glad it was a semi-forested walk for the shade. It was all downhill also! We passed several groups of people who were taking the opposite ‘tour’….walking up the trail to the top of the cave to crawl down that hole/staircase and walk downill through the cave. I think I’d rather take the route that WE took. Uphill through the cave, downhill out of it!
Back at our car we ate our packed lunch. Sub sandwiches (home-made), oreos, zucchini bread, bananas and water/Gatorade/Green Tea. Shockingly, it was almost 2pm, which put us way behind our schedule. It was another 1.75 hour drive to our next destination! We used the facilities (the Mt St Helens area is all vault toilets, yuck) and headed out.
The drive to Windy Ridge wasn’t all that fun. It was windy, not windy, but windy. We wondered if it was called Windy Ridge because of the windy road and not the wind. Got it? :)
At one point we were sure we must have missed a turn because Mt. St. Helens didn’t appear to be getting any closer! Everyone was sleeping in the car, we had no GPS or cell service or data access in order to double check that we were heading the right way. The road was steep and curvy and I was not looking forward to driving back the way we came either. Ugh. I wondered if it was a mistake going to this observatory instead of the Johnston Ridge location.
Alas, the mountain came into view. As we stopped at one of the viewpoints we saw a sign that there would be a Forest Service representative giving a talk at 3:30. It was 3:20 and we were still several miles away, but decided to gun it and go for it! We made it, about 5 minutes late, but in enough time to hear the presentation.
Sadly, the mountain top was hidden beneath the clouds. Grrrrr…….
After the presentation we hiked up to the top of the ridge. 437 steps. Yep, we counted them. It was a brutal walk and I never would have guessed there were that many steps (I just kept my head down, took slow deep breaths and plugged along up those stairs). We didn’t count them until our way DOWN.
The views from the top were spectacular! Sadly, the position of the sun didn’t allow me to capture vibrant photographs, so I apologize for the lack of clarity here.
The crater is completely filled and obscured by clouds…

That’s the new Spirit Lake….

Part of it. The lake has doubled in size from it’s original, and is also 200 feet higher in elevation than the previous lake.
You can still see all the fallen trees and logs that filled the landscape. They have settled around the lake’s edge. Supposedly, Harry Truman’s home, the St. Helens Lodge is about 150 feet below that first log ‘bump’ in the lake.

We walked the path a little farther to get some good views of the other side of the lake….

And pulled out the super lens to get a zoomed in picture of the logs at the far end…

ALL LOGS. Absolutely crazy.
We got some snapshots of the kids before heading back down the ridge to the parking lot…


And then we tackled the 437 steps down the hill….


Going down was waaaaay easier than going up! And the timing was just right- the mountain top was peeking out from under the clouds! If we had been here 1-2 hours earlier we would have missed this ‘clearing’ of the clouds!

And that was the best shot we were going to get. I was so bummed.
Back at the car we indulged in Doritos, the rest of the Oreos, refreshed our beverages and decided we’d hit every single viewpoint and attraction we came across. Most were just a parking lot with informational signs and interesting views, but some had trails. One trail appeared to lead to the edge of Spirit Lake at the log jam. You can see the trail in the picture below….

Yeah…..I’m standing at the trail head, and well, it heads left. We were walking through the forested hillside until we got far enough down to the valley floor and traversed that to the lake’s edge. We passed one family as we headed downhill, they were huffing and puffing and seemed to be struggling with the uphill walk, so we asked them if it worthwhile for us to continue, and they replied yes! So we kept on truckin’….
And they were right! Amazing view of the lake….

Again, pictures do not do any justice.


The interesting thing we learned from the Forest Service employee, was that all the hillsides around Spirit Lake used to be lush and green, with good deep soil. When the blast occurred back in 1980, the force was such that the areas facing the blast zone were literally stripped bare, down to the bedrock. Everything was completely obliterated. And that’s where we are standing- on the exposed bedrock looking over a lake filled with downed trees that are 34 years old.

I tried to capture what we were seeing….

Lots of exposed and bare rock, a scoured landscape….with new life!

Next time we do this trail (Harmony Viewpoint/Trail) we will pack a lunch/dinner and enjoy the lakeside. There was another family there swimming in the water, it seemed pretty clear and clean and they were having fun.
The walk up….not as bad as anticipated. Although, Brooke commented a few times that her legs were going to fall off or stop working. I tried to teach her the head down, lean forward, breathe in and out slowly- create a rhythm and just keep plugging along. She did better. She was carrying the largest intact pumice stone she could find (which weighed very very little) and Jim offered to carry it for her to lighten her load. It seemed to do the trick.

Turns out it was a 3-mile round trip hike!
The sun was starting to set and there was one more stop we HAD to make…. I really wanted to see Miner’s Car. We stopped at Meta Lake (which I thought was where Miner’s Car was) and it was a super short trail, only 0.3 miles. It ended at a really pretty lake, one that would be perfect for some floaties/loungers on a hot day! I don’t think that’s allowed though. It was very shallow at the edge- appeared to be pretty shallow quite a ways out as well.
(The pictures in the Meta Lake link look nothing like it does now. Today it’s very lush and green and there’s lots of foliage- it’s not desolate like shown).
In the parking lot we noticed a second trail, that led to another parking lot just a smidge farther up the road- it was for Miner’s Car!
Before I show you the pictures of how it looks today…. here’s some images I found online:

I don’t know when this next picture was taken…. but look at the surroundings….

And here’s the view today….

And the car?

I think it’s been jumped on a few times too many.
That marked the last stop on our list of must-see destinations. Since it was still light enough we decided to stop at others, the most interesting being Bear Meadows which is where the most famous blast pictures were taken! It told the story of how those photographs came to be, indicating that it used to be a campground. It’s not a campground any longer! We used the facilities (vault toilets again), and that marked our final stop.
We considered heading North to Randle and taking Hwy 12 back to I-5 and taking that route home, but knew it would be shorter to go back the way we came. Driving home wasn’t nearly as bad as we thought it would be- the road didn’t seem as steep and windy was previous. It was a 3-hour drive back home, though. Even though the kids slept most of that time, everyone was ready for bed as soon as we walked in the door.
Step count for the day? Over 23,000!!

Absolutely loved this post! Everyone here at the Mount St. Helens Institute is impressed with all the Mount St. Helens places you visited and such wonderful photography.
Thank you for the compliment!